


There are lots of post on internet about this topics even i read many of them and still reading..
So now you ask me what is new here, i says nothing.But Still I Promise You, It will be Unique Here.
The mobile smartphone and tablet industry seems to have a very prominent divide, with a lot of consumers having their favorite operating system and choosing to stick to hardware which is powered by their chosen OS. Obviously fans of Apple’s iOS use the iPhone and iPad devices, whereas Android lovers have a wide range of hardware to choose from due to the fact that the OS is available to multiple manufacturers.
But what happens if you are a die hard fan of iOS, or Windows Phone but you still want to sample the delights that Android Ice Cream Sandwich has to offer? I personally am an iPhone user for the last five years and will continue to be for the foreseeable future. But after recently getting my first taste of Android, I am severely tempted to shell out for a second device so I can have the benefits that both provide. For those that can’t, or won’t, purchase a second device then why not run Android 4.0 in virtualization on your desktop or laptop in order to see the Ice Cream Sandwich experience first hand?
Android 4.0 is an operating system in its own right, but instead of running on a dual boot setup, we install and run ICS within a free of charge virtualization application known as VirtualBox. VirtualBox runs like any other application or program on your machine, but offers the benefits of being able to install a secondary OS within it which can be invoked quickly by the user. For all those die hard iOS and Windows Phone fans out there, this is a perfect way to experience the delights of Android.
Are you ready for a whirlwind journey down Ice Cream Sandwich lane? Buckle in and follow the simple steps below.
Lets start To Look All the Ways By which we can run android on our computer... Best Of Luck...
<1> VIRTUAL BOX OR VMPLAYER
The Very First And Very Safe Way to test android to our pc is by doing process of virtualisation..
There are many software available to do this, so find one which you like. here i m using VIRTUAL-BOX.
- You can get VirtualBox here. VirtualBox is available for Windows, OS X, Linux, and Solaris.
- Download the Android x86 iso image file. Choose the one which is compatible to your system. In my case, I choose android-x86-4.0-asus_laptop-20111209.iso because I'm using Asus laptop. If there is none for your system, you may choose the one which is closest to your system. For example: HP netbook can use the iso for ASUS Eee PC family. Drawback is it might not fully compatible such as wireless card might not supported but all in all your system still able to run the Android.
- After downloaded, open VirtualBox and created a new virtual machine name it any name you like, select Linux as Operating System, and Other Linux as version. I allocated 512MB for Base Memory, 8GB Fixed-size storage in a vdi file.
- Before installation, make sure your parameters are set as below:
- Click Settings of the virtual machine, select Storage. Click Add CD/DVD Device icon next to IDE Controller to mount the downloaded iso. Then click OK.
- Make sure VirtualBox will boot CD rom first.
- Click Start, and hit Installation - Install Android-x86 to harddisk. (You may choose Live CD - Run Android-x86 without installation, it direct enters Android OS but all save changes you made in Android will lost after rebooted the system because it is for Live Demo purpose)
- In Partitioning Tool, select Create/Modify partitions.
- Highlight the Free Space, and use arrow keys to select New, select Primary, use all partition size for sda1 (or your preferred size). For your information, 1GB equals 1024MB.
- Select Beginning, select Bootable, select Write, and type yes to comfirm. After that, select Quit.
- Now you're back to the Partitioning Tool with a new option, select sda1 and choose OK.
- Format sda1 as ext3 and OK to format the partition.
- Select Yes to install boot loader GRUB.
- Select Yes to install /system directory as read-write. The installation will begin.
- After the installation completed, select Create a fake SD card. Creating a fake SD card will enables you to launch Gallery, Music Player, etc in Android. Set the fake SD card size as many your want but maximum value is 2047MB.
- Finally, the fake SD card has created. Before reboot, remember that you still have an Android installation iso image loaded as virtual boot CD-rom. So you have to click Settings of your virtual machine in VirtualBox, select Storage to remove the Android iso image file. Or, simply uncheck the CD/DVD-ROM box and make boot Hard Disk first.
- Now select Reboot.
- After reboot, GRUB loader screen will appear. Choose Android-x86 2011-12-09.
- Voila, the Android 4.0 Ice Cream Sandwich is running on you computer. One more thing, click Machine to Disable Mouse Integration which should be already as default. Click any part in Android screen to allow it capture your mouse pointer. To regain mouse control outside virtual Android, simply press right ctrl.
- Enjoy the Android 4.0 Ice Cream Sandwich.


Unfortunately, Here You Are unable to setup Internet connection in the VirtualBox. But Still You Want to use internet connection Go THrough Below Process
Fot this process You have to download different ISO from HERE
Create a Virtual Machine
In VirtualBox, create a new machine for Android.- Machine Name: "Android ICS" (you can name it anything you want)
- Machine Type: "Linux 2.6"
- Memory: I gave my VM 1024MB of memory.
- Hard Disk: I created a new 16GB VDI image that dynamically expands.
- Networking:
- Type: NAT
- Adaptor: "Intel Pro/1000 MT Desktop (82540EM)"
- Audio: Intel AC'97
- Storage Layout:
- IDE Controller:
- CD Device
- SATA Controller:
- Hard Disk
- IDE Controller:
Installation
Make sure the VM boots from the ISO image.- On the boot screen, select "Installation - Install Android-x86 to harddisk"
- Choose "Create/Modify Partitions". This takes you into
cfdisk.- Choose "[New]"
- Choose "[Primary]"
- Press enter to accept the default partition size (mine was 17174.38)
- Choose "[Bootable]"
- Choose "[Write]"
- Type "yes" to confirm writing.
- Choose "[Quit]"
- Choose to install on the sda1 device (Linux VBOX HARDDISK)
- Choose to format the drive "ext3"
- Pick "Yes" to confirm formatting.
- Pick "Yes" when it asks to install the GRUB bootloader.
- Pick "Yes" when it asks to mount /system as read-write (this will be important later to install the Google apps).
- Create a fake SD card when it prompts. I made mine 2047MB (the maximum allowed).
- Choose "<Reboot>"
Tips for Running Android
You'll want to disable mouse integration to be able to interact with the GUI at all. This can be done from choosing the "Machine" menu in the VM window and clicking "Disable Mouse Integration" -- or pressing HostKey+I. The Escape key on your keyboard corresponds to the Back key in Android. The context menu key on your keyboard corresponds to the Menu button in Android (the context menu key is usually next to the right Windows key).To power off the VM, press HostKey+H. This will cause Android to pop up the shutdown dialog that you'd expect on a real phone. You can also use the "Machine->Send Shutdown Signal" to do the same.
Install the Google Apps
You may notice that this Android VM doesn't include the Android Market, GMail, or Google Maps. These are some of the Google Apps and due to some licensing restrictions Android-x86 doesn't include them "out of the box". On a real Android device that's been rooted and flashed with a custom ROM, you'd install the Google apps by flashing them in recovery mode. But you can't get into recovery mode on VirtualBox. Thus, the method for installing the Google Apps is kinda sketchy, but it works (and if you know of a better way, feel free to tell me).You'll need a file with a name like "gapps-ics-20120304-signed.zip". These are the Google apps (the date part might be different). You can Google them, but I have a copy of them here to download too.
You don't really need the entire Google Apps file, actually. Just the "system" folder inside the zip file. Create a new tar file of the "system" folder so that it will be easy to get it into your Android device. I have a prepared "system.tar.gz" for you if you just want to use mine.
- GApps Download Links:
- gapps-ics-20120304-signed.zip (52MB)
- system.tar.gz (just the /system folder; 28MB)
- Download system.tar.gz to your Android VM somehow. I used the Web
Browser app and downloaded it there. You could probably also use the
Email app, or if you're really Android savvy, push it with the Android
Debugger.
- If Android tells you that there is no SD card so it can't download the Google Apps, that's because you skipped that step while first installing your Android system. The very last step of the installer asks if you'd like to create a virtual SD card partition, and you should've had it do that. If you didn't, the only easy solution I know of is to reinstall the OS.
- Open the "Terminal Emulator" app in Android.
- Enter these commands (note: don't type the $ or # symbols at the beginning of these lines. These symbols indicate the prompt.)
$ cd /sdcard/Download
$ tar -xzvf system.tar.gz
$ su
# cd /sdcard/Download
# cp -rf system/* /system/
Pay special attention to thecp -rfcommand. Make sure the slashes and *'s are in the right places. - Reboot the phone.
I imagine that the unorthodox way of installing the Google Apps might be partly to blame for the Market being unstable. The other Google apps seem to work fine though.
Custom Screen Resolutions
This is a tip I discovered somewhere a while back for getting custom resolutions to work in your Android VM (for example, to mimic the screen dimensions of the Galaxy Nexus phone, or just to run the VM at a higher resolution like 1024x768). I've found that you can use just about any arbitrary resolution you want, but when the resolution isn't a standard 4:3 one (like 1024x768), the VM seems to get somewhat laggy. The general steps are as follows. Substitute1024x768 with
whatever resolution you want. You can add multiple video modes by
changing "CustomVideoMode1" to be "CustomVideoMode2", etc.
- In your Terminal or Command Prompt window on the host system, run this command:
VBoxManage setextradata "Android ICS" "CustomVideoMode1" "1024x768x32"
Substitute "Android ICS" with the name of your VM (but keep the quotes). - Start your Android VM, and when you see the bootloader screen:
- Press the "e" key to edit the boot arguments
- Press "e" again to edit the kernel boot line
- Add
UVESA_MODE=1024x768to the end of the boot arguments (make sure to hit Space first), and press Enter. - Press "b" to boot.
")
No Warranty
Android is primarily an ARM architecture operating system and the x86 version isn't supported by Google. While a lot of apps will work in Android-x86, some may crash in weird ways. If you're an Android developer though, this can be pretty useful because Android-x86 will run a lot faster on your hardware than the standard emulator from the SDK does, so you can test your apps much more rapidly (the Android-x86 site has some documentation on how to connect ADB to your virtual machine). Your mileage may vary.Updates
To answer common questions that come up in the comments...- Adobe Flash, Netflix, others... -- these apps won't work in Android-x86, because they aren't pure Java. They include C code that's compiled for the ARM processor found in most Android devices. They won't run on x86 processors.
- Apps that rotate your screen... -- apps that force the orientation into portrait mode (thus turning your screen sideways) can be dealt with by changing your VM's screen resolution to be taller than it is wide (i.e. 800x1280). The app will recognize the portrait resolution and not rotate. However, your VM may be laggy when it's not in a standard 4:3 resolution. Alternatively, find an app that forces/locks your orientation to one direction or another -- however, some apps misbehave when forced to use the wrong resolution and may not be usable.
- Don't expect a lot of apps to work -- for various reasons, apps that work on real Android devices may not function properly on Android-x86.
- Text messaging and phone calls won't work -- Your virtual machine is not a phone. It doesn't have a cellular connection to AT&T or Verizon or anybody. The standard texting apps like Messaging and Handcent SMS are useless on an Android VM (this also goes for most Android tablets that don't have cell connections). If you want to text from your VM, you might try using the Tablet Talk app, connect it with your actual cell phone, and text through that app. If you want to make phone calls, you might have luck with a Voice over IP app -- however, I can't guarantee your microphone and such will work with the VM, as I haven't tested it.
<2> INSTALL ANDROID ON USB
Things need to prepare for installation:UNetbootin, Android-x86 4.0, 2 thumb drives (1 as bootable Live USB drive, another 1 for Android installation).
Let's get it started:
- Download UNetbootin.
- Download Android-x86 4.0 ISO file.
- Insert a thumb drive into USB port.
- Open UNetbootin, choose Diskimage, select the Android-x86 ISO file, and select your target USB drive.
- Click OK. Then UNetbootin will create your thumb drive to a bootable Live USB.
- After UNetbootin is done, insert another thumb drive (or SD card/external hard drive if you wish to install it there)
- Click Reboot Now to restart computer.
- While starting computer, press appropriate keyboard button (Mine is F2 but may vary depending on laptop manufacturer) to get to BIOS boot menu and select USB drives to boot first before HDD or CD/DVD rom. Save and Exit.
- Your computer will restart again and boot your Android x86 thumb drive. Select Install Android-x86 to harddisk.
- When you in Choose Partition page, select your target thumb drive (usually in sdc1) to install.
- Format your thumb drive as FAT32.
- Select Yes to install boot loader GRUB.
- Select Yes to install /system directory as read-write.
- If asked you to create user data image, make it 512MB (you can customize the value if you want).
- After the installation completed, choose Create a fake SD card. Creating a fake SD card enables extra features in Android such as Gallery, Music Player, etc. I make it 2047MB, you can lower the value if you want.
- When it is done, remove your bootable Live USB thumb drive and hit Reboot and enter BIOS boot menu again and make sure the Android thumb drive is in first boot order.
- You have done it! The Android x86 4.0 Ice Cream Sandwich is installed in your thumb drive and ready to rock!


<3> INSTALL ANDROID ON YOUR HDD USING LIVE CD
- Burn the iso image to cdrom, or create a bootable USB disk (recommended). See the Advanced section for details.
- Boot from the Android-x86 installation CD/USB, choose the 'Install Android to harddisk' item, as show below

- After seconds of booting, you will see a partition selection
dialog. You can choose an existing partition to install Android-x86, or
you can create or modify partitions by choosing 'Create/Modify
partitions'. Note you can install Android-x86 to an external disk like
USB drive. If the target drive is not shown, try 'Detect devices'.

- Android-x86 can co-exist with other operating system or data in
the chosen partition. If the partition is formatted, you may choose 'Do
not format' to keep existing data. Otherwise, choose a filesystem type
to format. Note the type you chosen must match the partition id, or the
boot loader will fail to boot.

Also note if you choose to format to fat32, you will see a
warning that android cannot save data to fat32. You can still proceed to
install, but the installed android system will work like a live cd
system. That is, all data will lose after power off. Therefore we do not
recommend to install Android-x86 to a fat32 partition.
- Next question is whether to install boot loader Grub.
Usually you should answer yes, unless you want to install boot loader
by hand yourself. Note the installer only creates boot items for
Android-x86. If you hope to boot other operating systems, you need to
add the item to /grub/menu.lst manually. See the Advanced section for how to do this.

- If you are lucky, the installation will begin, and you will see the progress bar.

- If you see this screen, the installation is complete.
Congratulations! Now you can run Andrond-x86 directly, or you can reboot
and run it.

Multi-boot
To boot other operating systems, you have to add items for them to /grub/menu.lst. For example, to boot Windows, add the following:title Windows
rootnoverify (hd0,0)
chainloader +1
This assumes the Windows is installed to the first partition of the first hard disk. Or you need to change rootnoverify to the appropriate value. See Grub manual for details.Updated (2010-10): Since froyo-x86, if there is an NTFS partition in the installed disk, the installer will ask if you want to create a boot item for Windows, as show below

Issues
VMware
You have to change your virtual disk type to be IDE because the default type in VMware is SCSI, and Android-x86 kernel is not configured to support SCSI. You can follow these steps:- Create a virtual machine.
- Edit virtual machine settings after the virtual machine created.
- Choose the hard disk and remove it.
- Add a hard disk to create a new virtual disk, then you can choose IDE as your virtual disk type.
- When finished, you can install android-x86 normally.
<4> RUN ANDROID APPLICATION USING 3RD PARTIES SOFTWARE
RUN ANDROID APPLICATION TO YOU PC OR MAC USING BLUESTACKS
BlueStacks Brings Over 750,000 Android Applications To Windows 8 And Surface Pro
Download From Here [BlueStacks]
Please fulfill the following pre requisites,
1) You must have Administrator privileges on your PC
2) The default installation drive is C:\., currently there is no option to install it in any other drive.
3) Windows XP or Windows Vista pre requisites
********************
We do not recommend installing the BlueStacks App Player (beta-1) if you have a virtual machine, e.g., Microsoft Virtual PC, VMWare Workstation, or Oracle VirtualBox, installed on the same host.
********************
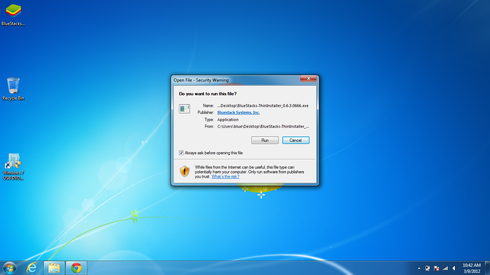
Please double-click the BlueStacks App Player (beta-1)'s Thin Installer downloaded earlier, for example, on your PC's desktop. The Thin Installer is in fact a lightweight installler that manages the download, installation and initiation of BlueStacks on your PC.
You will see a popup from Windows asking for your permission to allow it to install BlueStacks. Please click "Run" to begin installing BlueStacks.
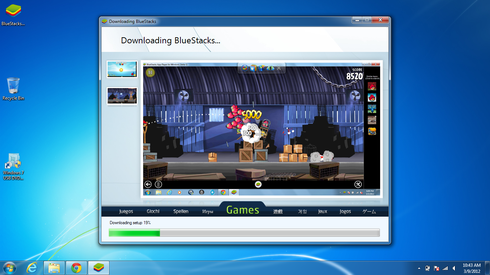
The Thin Installer will begin downloading BlueStacks

You will be able to track the progress of the download
Once the download completes, BlueStacks will be installed immediately.
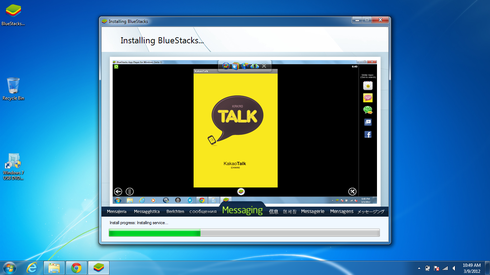
The Thin Installer will install a dock at the top of your screen, an Android Apps folder and shortcut to Start BlueStacks on your desktop. .

1) You must have Administrator privileges on your PC
2) The default installation drive is C:\., currently there is no option to install it in any other drive.
3) Windows XP or Windows Vista pre requisites
********************
We do not recommend installing the BlueStacks App Player (beta-1) if you have a virtual machine, e.g., Microsoft Virtual PC, VMWare Workstation, or Oracle VirtualBox, installed on the same host.
********************
Please double-click the BlueStacks App Player (beta-1)'s Thin Installer downloaded earlier, for example, on your PC's desktop. The Thin Installer is in fact a lightweight installler that manages the download, installation and initiation of BlueStacks on your PC.
You will see a popup from Windows asking for your permission to allow it to install BlueStacks. Please click "Run" to begin installing BlueStacks.

The Thin Installer will begin downloading BlueStacks

You will be able to track the progress of the download

Once the download completes, BlueStacks will be installed immediately.

The Thin Installer will install a dock at the top of your screen, an Android Apps folder and shortcut to Start BlueStacks on your desktop. .

Watch This Video For Help..
YouWave is Android on your Windows PC
Download From Here [YouWave]

Playing
with the Android emulator on your computer is a pretty geeky endeavor,
but YouWave makes it easy to accomplish on your Windows PC. If you can
download and install a Windows program, you can have an Android
2.1-update 1 virtual machine running on your desktop in just a few
minutes. All without ever touching the SDK or Sun's JDK. As a bonus,
the Window it runs in has a really easy method of installing third party
apps from free Android applications stores, as well as apps downloaded to your PC.
It's
not without its flaws, and there are no Google applications of course
(yet), but it's just as easy to uninstall if it's not for you. Grab the
program from the source link, and hit the break for an installation and
quick breakdown video to get you started.
<5> RUN ANDROID NATIVELY ON WINDOWS
Run Android in Windows like it was any other application
Essentially, WindowsAndroid allows you not only to execute Android apps on your Windows computer, but also use the browser, not to mention every other component of the operating system. In other words, this goes above and beyond BlueStacks, a Silicon Valley company that enables Android apps to run on PCs and Macs.


The whole process of signing up, downloading, and installing should take you less than 15 minutes. If you don’t have a touchscreen, you can use your mouse to navigate the interface. The first thing I did was fire up the browser, used my keyboard to type in “thenextweb.com,” and hit enter. Not all the images loaded, but you get the idea:
At this point I got curious about how all this was working. A quick look at the basic documentation (PDF) showed me this was an ongoing project with the goal of porting Android completely over to Windows, leveraging the Dalvik virtual machine to run Android apps. The other goal is to obtain high performance thanks to the Windows operating system and PC components, including hardware acceleration and media codecs.
Here’s the official feature list, typos and all:
- Current ported Android version is 4.0.3r1, new version is being developed.
- Can run on Windows Vista, Windows 7 and Windows 8.
- Has exactly the same user experience with the original Android2.
- Integrated with Windows’ applications, such as Flash, Windows Media Player, etc.
- Supports any UI resolution, such as 1920×1080
- Supports windowing mode or full-screen mode, window scaling in windowing mode, and switching between windowing mode and full screen mode.
- Supports IO devices such as mouse, keyboard, remote control.
- Supports Ethernet, pppoe.
The developers tell TNW the project began in 2010 “as something fun” with the porting of Android 2.1 (Éclair) and then later Android 2.3 (Gingerbread), mainly to test “the feasibility of our strategy.” It wasn’t only until last year that they made the effort to port Android 4.0.3. They used their old porting codebase and performed multiple rewrites with three main goals: full support of an original Android version, as efficient as possible, and easy to synchronize with Google’s canonical codebase (for future releases).
Speaking of the future, SocketeQ tells TNW that the software “is still in early development status” and that the startup is working on “integrating more features like full app running support, media playback and whole OpenGL ES emulation based on Desktop OpenGL.” Again, this is just an experiment right now. Expect major bugs and crashes. Still, it’s a very ambitious project, and one that we’ll be keeping a close eye on.


 :)
:)
 :-)
:-)
 :))
:))
 =))
=))
 :(
:(
 :-(
:-(
 :((
:((
 :d
:d
 :-d
:-d
 @-)
@-)
 :p
:p
 :o
:o
 :>)
:>)
 (o)
(o)
 [-(
[-(
 :-?
:-?
 (p)
(p)
 :-s
:-s
 (m)
(m)
 8-)
8-)
 :-t
:-t
 :-b
:-b
 b-(
b-(
 :-#
:-#
 =p~
=p~
 :-$
:-$
 (b)
(b)
 (f)
(f)
 x-)
x-)
 (k)
(k)
 (h)
(h)
 (c)
(c)
 cheer
cheer


This site really has all of the info I needed concerning this subject and didn't know who to ask. How To Password Protect Folder In Less Than Four Minutes Using These Amazing Tools.
ReplyDelete